By Mike Shuck
When I retired from a career in manufacturing management (three different companies), it was time to choose a spot to retire. It would be our 13th move, and I asked my wife – “Where do you want to go?” as jobs had always dictated our new location. Our two kids had both graduated from ISU and stayed in the community after graduation. Soon our grandchildren arrived, and my wife said she wanted to be “GrandMa” for those two kids. She picked Bloomington/Normal. I commented that they had an airport and a Harley dealer, so it met all my requirements. Harley would shut down 6 years later. After settling into a new home in Normal, I set off to find out what car club activities there were and soon found the Flat Landers British Car Club. I eventually figured out why the Champaign Car Festival was held in Bloomington, IL.
I was soon attending Natter N’ Noggin and various other activities. I always said the MGB looked good at 100 feet. At 10 feet, the rust on every fender, cracked paint, and door cracks at the mirrors were typical for a 50-year-old British classic. The dilemma was, to restore or let it die a peaceful death, and I was retired with no winter project. For some unknown reason, I decided to start the restoration myself, knowing I was only a rattle can painter and maybe MAACO could paint it after I completed the bodywork, which I did have some limited experience with.
While in the Navy, I bought a 305 Honda Scrambler and soon wanted to convert the gas tank into an Easy Rider peanut style tank. A neighbor introduced me to Bondo, and away I went. After three days of sanding, he introduced me to the cheese grater and said you don’t have to do all that sanding. I can also install drywall, but I soon learned I am not a drywall finisher. I actually found out that O’Reilly’s in Decatur, IL would put any color you wanted in a spray can. That was my plan D… 12 rattle cans would get’er done. One way or another, this car was going to get painted. So away I went, stripped the car completely, and started the bodywork. Thinking a front fender was ready to paint, I had some friends from Flat Landers critique my work, and they politely said I was nowhere close to painting, as the panels were “a lil rough.”
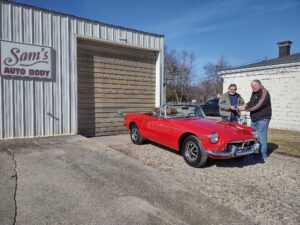
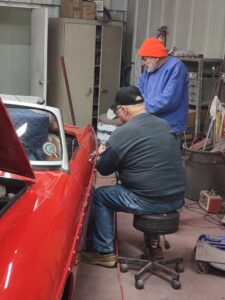
They did have a suggestion as to who might assist me, and this is where Sam Latimer, of Sam’s Auto Body in Shirley, IL, enters the scene. His 40 years of experience and recent retirement matched my quest. I invited him over and felt like I was trying to get my kids into college, convincing him the car and I were worthy. Someone said if Sam does your car, his name will be on it and he’ll care more about it than you do, and he’ll treat you fair. I’d soon find out. I invited him over for a look see and begged him to help me, as my MGB was an ideal candidate for restoration…. we’ll sort of. He looked it over and pointed out things I had never considered in a restoration, and I was immediately impressed with his knowledge, yet he was not degrading the car. . . just pointing out the facts. We agreed that I would put in some sweat equity, I would pull the engine, and he would paint the car and the engine bay with me assisting anywhere he would allow me. We shook hands and started at Sam’s on November 13th, knowing that someday I would drive it home.
I worked every day with Sam, logging in my sweat equity credits. Each day, we would start with a goal and what tasks each of us had. His patience and expertise took us forward every day as I learned how to “properly” sand, grind, and prep with every tool that Sam had available, and he has them all. As Sam was helping me pull the motor, it was just about free but a little something was holding it back. I had forgotten to unhook the throttle and choke cables. What a rookie mistake.
Some rust spots needed brushing, and Sam would turn me loose with an electric wire wheel. He always thought I went too far, as I would leave him a giant hole to weld up. So, from then on, he was very cautious when he gave me assignments involving any type of abrasive tool. It became a common joke that I wanted to take a wire wheel to it.
Donor doors and hinges were acquired, and four days later they were perfectly fitted. We took them on and off at least a dozen times. Clearly, Sam cared more about the fit than I did. I was happy with them after day two.
The hood was twisted and had numerous surface paint cracks, and I decided it was more productive to find a new/used hood. We purchased one in Decatur but closer examination revealed that after removing the underside insulation, the adhesive would be a major effort to remove, and I wanted an underside painted without insulation. Another hood was obtained, and it was a new / aftermarket product from Tiwan. Some small dings, which is typical after shipping but otherwise perfect. . . hoping it would fit. We put it on just to see how it fit and after a couple of adjustments by Sam, we both gave it a thumbs up. Sam had forewarned me about after-market versus OEM. Sometimes that stuff just doesn’t fit.
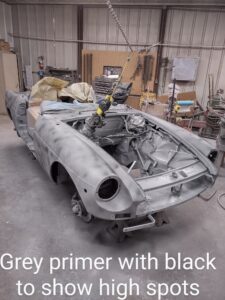
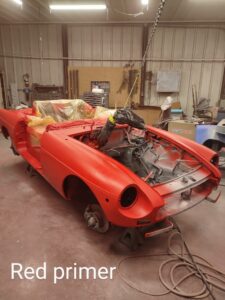
My rattle can experience graduated to spray gun epoxy primer. Why did we have to put on gray primer AND red primer? I would soon find out. I would look at a panel I had just completed, feeling pretty proud of myself, and then Sam would take a look at it, and I knew I was going to be applying more Bondo. Wax on, wax off, had a whole new meaning.
Getting Sam’s approval was tantamount, and I felt like I had really accomplished something when it was a thumbs up. Sam even let me spray on a good portion of the Red primer, which was applied over the grey primer. As I was sanding the red primer, it was very important not to go too far, as you didn’t want to get down to metal. Ah . . . good thing we put on that grey AND red primer. Once the base coat had been applied, three coats of clear were applied, and I thought it looked pretty good after that, but I knew Sam would wet sand the clear and polish it, making it even better.
The next morning, I entered the shop, and Sam had already started to wet sand the clear coat, and I was just devastated as it looked so good yesterday and now it was all scratched up. I joined in on the wet sanding, after Sam told me the “proper” way to do it, and I’m glad he did. The next morning, he had it buffed and polished, and it was amazing with a gloss to knock your eyes out.
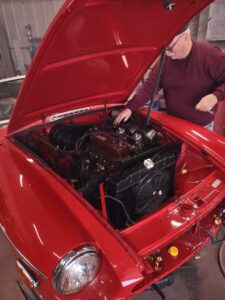
Most days were steps forward, but there were days when there were steps backwards. Alan Kleinschmidt and Dick Brown came over to help us sort out electrical issues. I had marked all the wires with painter’s tape and code, but when you primer over them, they are impossible to read. Nigel Keen showed me his laminated electrical schematic, and creating that for my car would be a good place to start. Alan and Dick spoke in a language that was foreign to me, and little by little, lights and indicators would start to work. The only problem was that once you accidentally moved some wires, things didn’t work. It was time to replace all the connectors and clean the bullet tips.
The battery would not last very long, and I agreed to replace it. I took a picture of it outside the compartment, as that gave an indication of how it went back in. The mind does funny things. When you look at a red battery cable, you automatically think positive, and black means negative. We would all agree on that. That’s how I hooked it up and luckily Alan was at the front of the vehicle, as after my connection, smoke was rolling out of the alternator, and “that smell” was very evident. My negative ground car had a red cable going to the negative battery post. Why the PO did that, I don’t know. Thinking this could be a major setback, as in, a new wiring harness, we said the logical thing was to replace the alternator, and overnight O’Reilly’s had one there the next morning. After checking everything out, the battery was not charging. I noticed a wire had come out of the connector at the alternator. This had happened before. Gotta fix that thing. Everything was checking out, and I had dogged a massive bullet. The wiring continued as Alan was figuring things out, and pretty soon he had everything except right turn signals and four-way flashers, which was probably more than what I came in with.
FINAL STAGES
At last, we were ready to start putting things back on the car. I was amazed at how careful you had to be, as just the handling of tools and parts, you could be bumping things up against fresh paint, if you were not truly aware of what you were doing and how you were moving around the new piece of art. Slowly, it all went back together. Many days we spent time looking for a tool we just used and put down “somewhere.” Luckily, most parts were in plastic bags and could be obtained easily.
The best part of the day was lunch. Sam has a gas grill outside, and we heated things up and had picnics every day inside the shop, where conversation would solve issues like world hunger and such. The weather was starting to turn slightly, and the hopes were that I would be able to drive it home on a warm day, and Valentine’s Day it was. 14 weeks, and it was finally finished.
Sam and I agreed early on that this was a MGB to enjoy and drive. Local car shows were anxiously waiting to see the transformation, but I was not going to be taking it to any concourse events. however, it would stand its own ground in any setting.
Thank you, Sam and family, for letting me pursue this dream. Someone advised me early on when I was considering a restoration. You’ll never get your money back out of it, that’s not the point. The point is that you’ll enjoy it soooooooo much more.

